Photo Coasters tutorial
by Lee La La
Hi Craftaholics Anonymous!
I am Lindsay of the blog Lee La La, where I take on life, and squeeze in some creating during nap time. The beauty around me is my constant inspiration.
I am Lindsay of the blog Lee La La, where I take on life, and squeeze in some creating during nap time. The beauty around me is my constant inspiration.

{my family of three}
I am over the moon excited to be guest posting.
What a treat it is to be crafting with you all today.
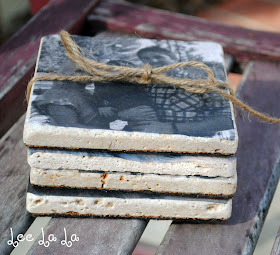
We are going to make these adorable coasters, just in time for Valentines Day.


Supplies:
4"x4" tile coasters
white tissue paper
printer
scotch tape
scissors
Mod Podge (Matte or Gloss)
paint brush
Krylon acrylic clear coat
black felt with adhesive backing

Let's get to work!
white tissue paper
printer
scotch tape
scissors
Mod Podge (Matte or Gloss)
paint brush
Krylon acrylic clear coat
black felt with adhesive backing

Let's get to work!
1. Print out a 4x6 photo onto white tissue paper.
To help the tissue feed thru your printer, Cut out an 8x10 piece of tissue paper and scotch tape it to a piece of 8x10 card stock.
2. Cut your tissue print down to 4"x4"

3. Brush a thin coat of Mod Podge over your tile and paste your photo onto the tile. Let dry COMPLETELY!

4. Once dry, put a thin coat of Mod Podge over your photo. Let dry completely.
Repeat 2 more times, making sure each coat is dry before you do another, or else the tissue will rip.

5. Once dry, seal with Kylon acrylic clear coat. I did 3 coats of this, making sure the previous coat is dry before you add another.
6. To complete the coaster, cut out a 4"x4" piece of black felt. and attached it to the back.

7. Project Complete!

Wrap up 4 coasters with some ribbon or twine and you have a wonderful GIFT!
*I've done this project with gloss mod podge and matte mod podge. Although completely different looks, both look fantastic.
Thank you for crafting with me! And thank you Linda for having me over!
I'd love it if you stopped by and said hello!
Contact Me:
Blog
Etsy Shop
Face Book
To help the tissue feed thru your printer, Cut out an 8x10 piece of tissue paper and scotch tape it to a piece of 8x10 card stock.
2. Cut your tissue print down to 4"x4"

3. Brush a thin coat of Mod Podge over your tile and paste your photo onto the tile. Let dry COMPLETELY!

4. Once dry, put a thin coat of Mod Podge over your photo. Let dry completely.
Repeat 2 more times, making sure each coat is dry before you do another, or else the tissue will rip.

5. Once dry, seal with Kylon acrylic clear coat. I did 3 coats of this, making sure the previous coat is dry before you add another.
6. To complete the coaster, cut out a 4"x4" piece of black felt. and attached it to the back.

7. Project Complete!


*I've done this project with gloss mod podge and matte mod podge. Although completely different looks, both look fantastic.
Thank you for crafting with me! And thank you Linda for having me over!
I'd love it if you stopped by and said hello!
Contact Me:
Blog
Etsy Shop
Face Book

What a cute idea!
ReplyDeleteI like this tutorial! I have seen these coasters done many different ways... this is a great technique, can't wait to try it :)
ReplyDeleteGreat simple idea. Thanks for sharing =)
ReplyDeleteI'm going to make some of these for all the grand (and great grand) parents. I think they'll love them!
ReplyDeleteI love Lindsay! Great tutorial!
ReplyDeleteLindsay, these are amazing! What a great idea. You're really talented.
ReplyDeletexo
Valerie
LOVE this idea!!!
ReplyDeletewhere did you buy the coasters from?? i want to try this!
ReplyDeleteLove this project Lindsay! Going to have to try it!!
ReplyDeletexx
www.goodgirlgoneglad.com
i love this idea...my son loves to bang my coasters together and i hate the sound it makes...never thought to put felt on the bottom...this is such a great idea :)
ReplyDeleteI LOVE this as a gift idea! People always need coasters! Thanks so much for the great how-to, I'll be linking.
ReplyDeleteHow do they hold up with condensation? I think this is a great idea, but just wondered about that. :)
ReplyDeleteSuch a cute idea! I'm curious, and often not too bright, is there a trick to printing on tissue paper?
ReplyDelete